This post may contain affiliate links. Please read our disclosure policy.


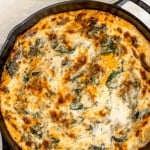
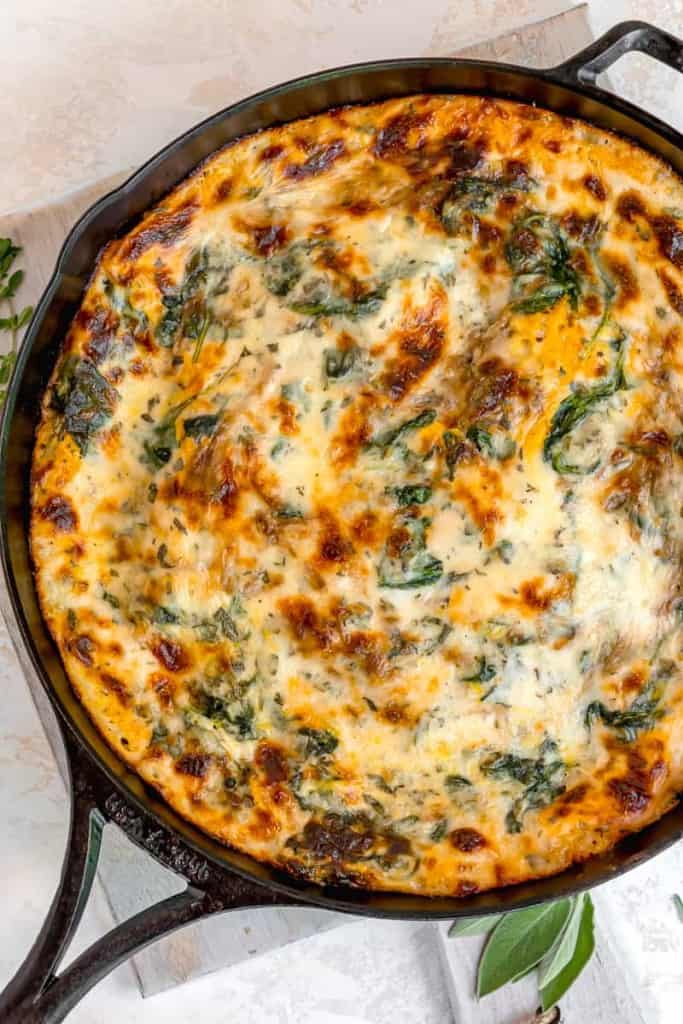
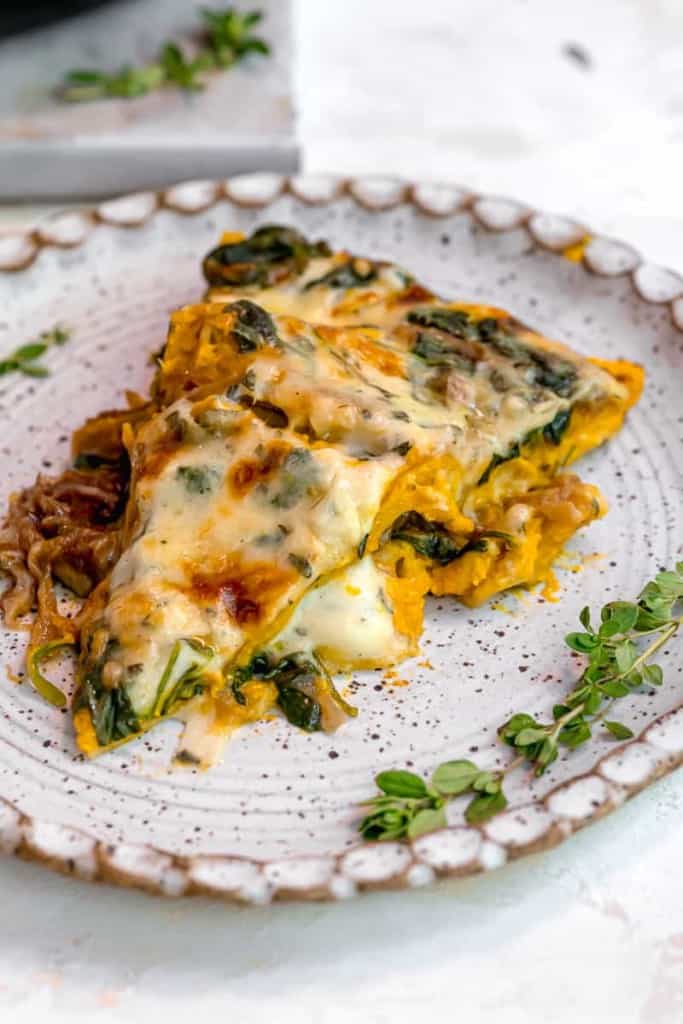
This squash lasagna is seriously the best comfort food for a cold night! Each lasagna layer is filled with delicious flavors of kabocha squash, fresh spinach, and a creamy béchamel sauce topped with melted gruyere cheese. And the best part? It’s easy to make in a cast iron skillet!
What is kabocha squash?
If you’ve never heard of kabocha squash, it’s time to add this delicious vegetable to your cooking repertoire!
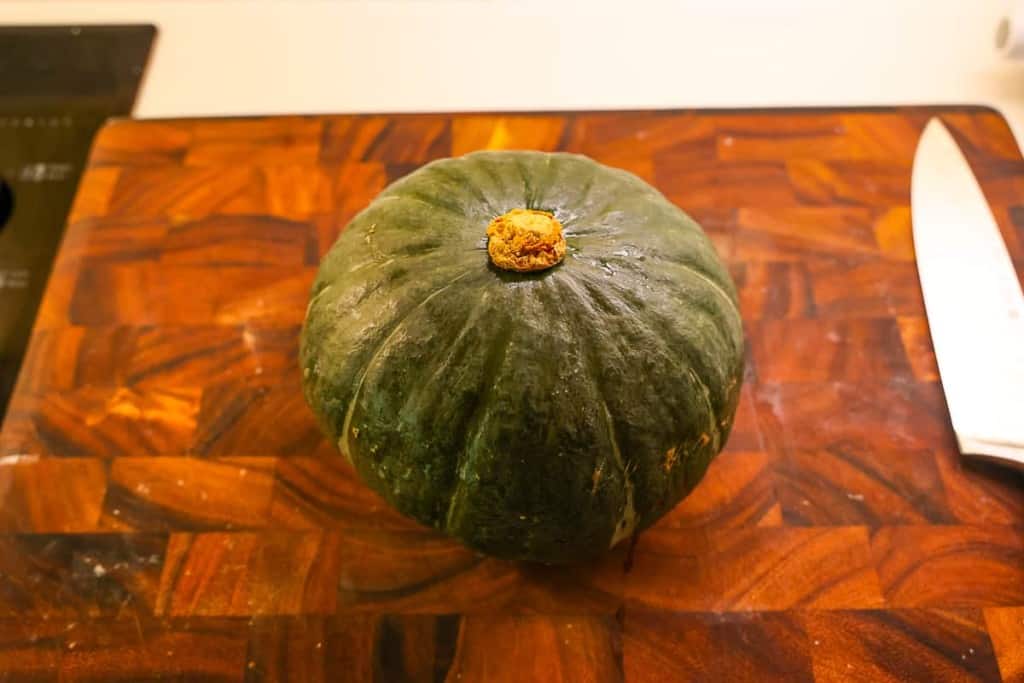
Kabocha squash is a type of winter squash that originated in Japan and has been gaining popularity all over the world. It has a deep green skin with orange stripes and is known for its sweet, nutty flavor.
Kabocha squash is actually a bit sweeter than butternut squash, but it’s still pretty mild in taste. The texture is like a mix between a pumpkin and a sweet potato. So it’s like getting the best of both worlds!
How do you eat kabocha squash?
Apart from this lasagna recipe, the best way to enjoy Japanese squash is by cutting it open, removing the seeds, and roasting it. You can eat the skin, but for this recipe, we won’t be using it.
Email this Recipe!
Email this recipe to yourself to save for later.
By submitting this form, you agree to receive emails from Girl with the Iron Cast.
Why this squash lasagna recipe works
- Using kabocha squash instead of traditional meat gives this dish a lighter and healthier twist without sacrificing any flavor.
- The cast iron skillet helps distribute heat evenly, giving you perfectly cooked layers of squash and noodles.
- A homemade béchamel sauce adds a touch of creamy goodness to balance out the sweetness of the squash.
- The addition of fresh spinach adds some much-needed color (and nutrients) to the dish.
- Use no-boil lasagna noodles to save time and make this dish even easier to prepare.
- Easy to make ahead for a meal prepped weeknight dinner!
Ingredients needed
Here’s everything you need to make this kabocha squash lasagna…
- Kabocha squash
- No-boil lasagna noodles
- Fresh spinach
- Ricotta cheese
- Gruyere cheese
- Whole milk
- Butter
- Eggs
- Fresh herbs (thyme and sage)
- Garlic and onions
- Wine (red or white)
- All-purpose flour
- Ground nutmeg
- Salt and pepper
Tip:
Can’t find kabocha squash? You can substitute it with butternut squash or pumpkin!
How to make cast iron squash lasagna
Putting together this skillet lasagna is pretty easy, and you’ll have dinner on the table in no time! Follow these simple steps, and be sure to impress your friends and family with this delicious dish.
Note: Before you do anything, preheat the oven to 400°F.
Step 1: Prepare the kabocha squash
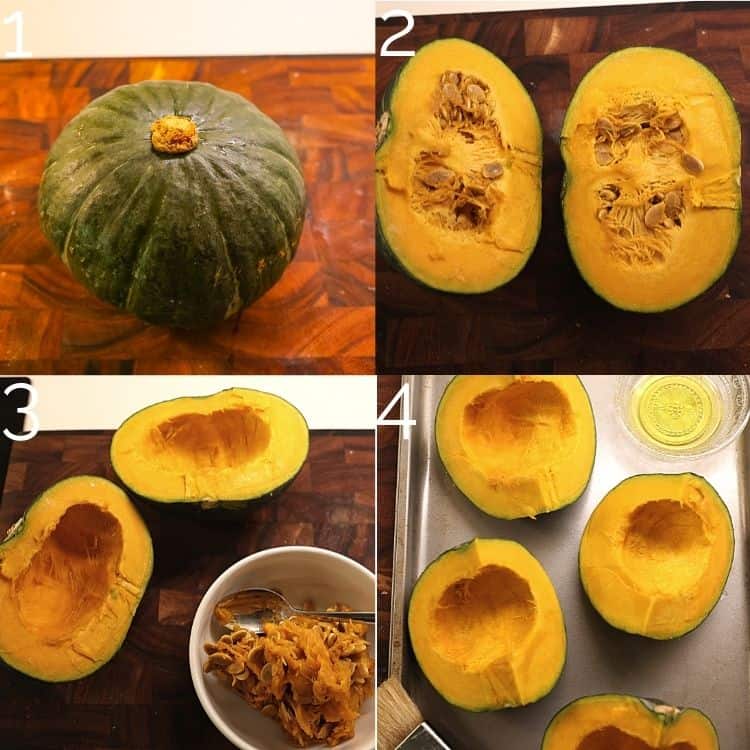
This type of squash is pretty tough to cut, so be sure to use a sharp knife and caution!
- Carefully cut the squash in half.
- Then, using a spoon, scoop out the seeds and get rid of them.
- Cut the squash halves in half again, so you end up with 4 pieces of squash.
- Place the squash on a baking sheet and give the insides a good brush with olive oil.
- Then, don’t be shy with the salt and pepper – sprinkle it on each quarter!
Can I use frozen squash?
Yes, you can use frozen squash if that’s all you have. However, fresh squash tastes much better and has a firmer texture.
Can I roast the squash seeds?
Yes! Just like pumpkin seeds, you can roast the kabocha squash seeds and enjoy them as a snack.
Simply remove any excess squash flesh from the seeds, rinse them off, dry them with a paper towel, and toss them in olive oil, salt, and any other desired seasonings.
Bake at 350°F for about 20 minutes or until golden brown.
Step 2: Roast the squash pieces and garlic
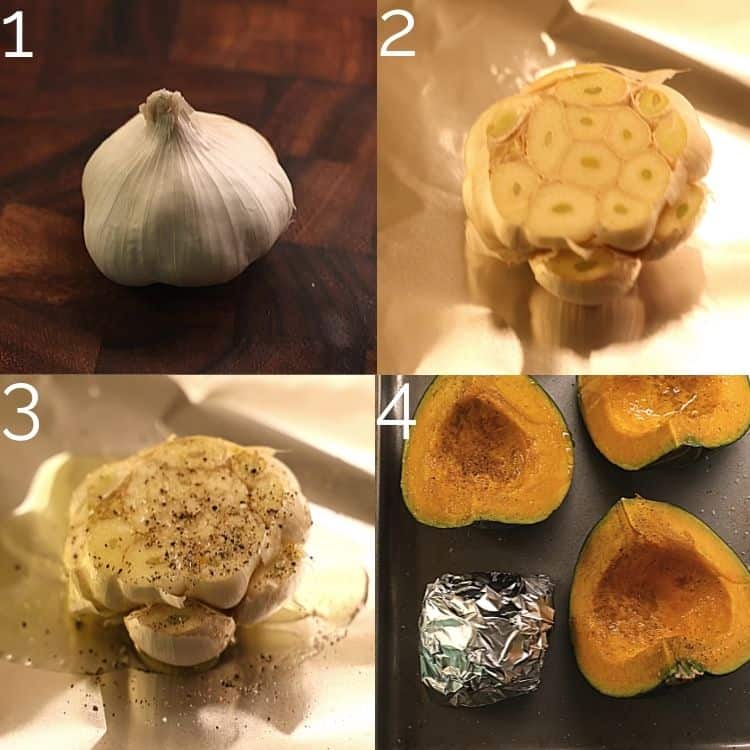
- Once the squash is prepped and seasoned, cut off the top 1/3 of the garlic head.
- Then, place it on a sheet of foil and drizzle 1 tablespoon of olive oil over the exposed cloves. Don’t forget to add a pinch of salt and pepper on top!
- Now, tightly wrap the garlic in the foil and place it on the baking sheet with the squash.
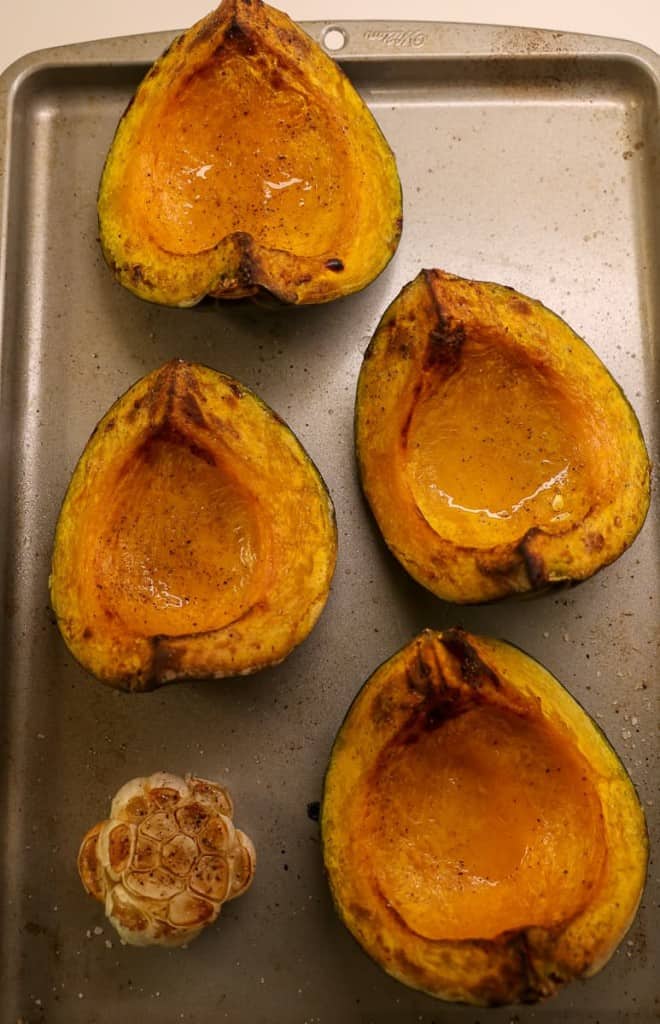
- Let everything roast for about 45 minutes or until the squash and garlic can be easily pierced with a fork.
Do I have to roast the garlic?
No, you don’t have to roast the garlic if you don’t want to. However, roasting it enhances its flavor and gives it a sweeter taste.
Can I use pre-minced garlic?
Yes, you can use pre-minced garlic instead of roasting a whole head. Use 2-3 teaspoons of minced garlic for this recipe.
Step 3: Caramelize the onions
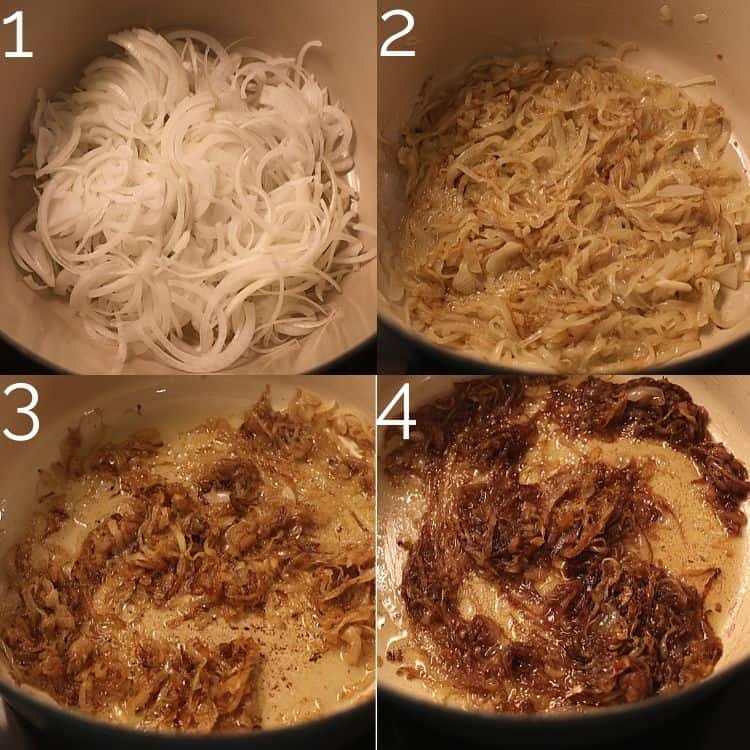
- Grab a Dutch oven and melt some butter over medium-low heat. Once it’s all melted and sizzling, toss in the sliced yellow onions.
- Cook the onions down, giving them a good stir every now and then, until they turn a beautiful dark amber color and become jammy. This will take about 45 minutes!
- Once those onions are perfectly caramelized, pour in 1/4 cup of wine, let it simmer, and reduce for about 3 minutes.
Why should I caramelize the onions?
When onions are cooked low and slow in fat, the sugars within transform, leaving you with a complex sweet-tasting onion. Caramelizing onions add a great depth of flavor to dishes.
What’s the best way to cut onions?
I like to use a mandoline to cut my onions so that they are thinly sliced and will cook evenly.
Note: Please use a guard or wear cutting gloves when using mandolines. They are very sharp!
You can also cut your onions with a sharp knife; just make sure they are thinly sliced.
What’s the best kind of wine to caramelize onions?
You can use any wine you have on hand! Red wine will give your lasagna a deeper, richer flavor, but white wine will be just as delicious. Use what you prefer or have available!
Step 4: Make spinach filling
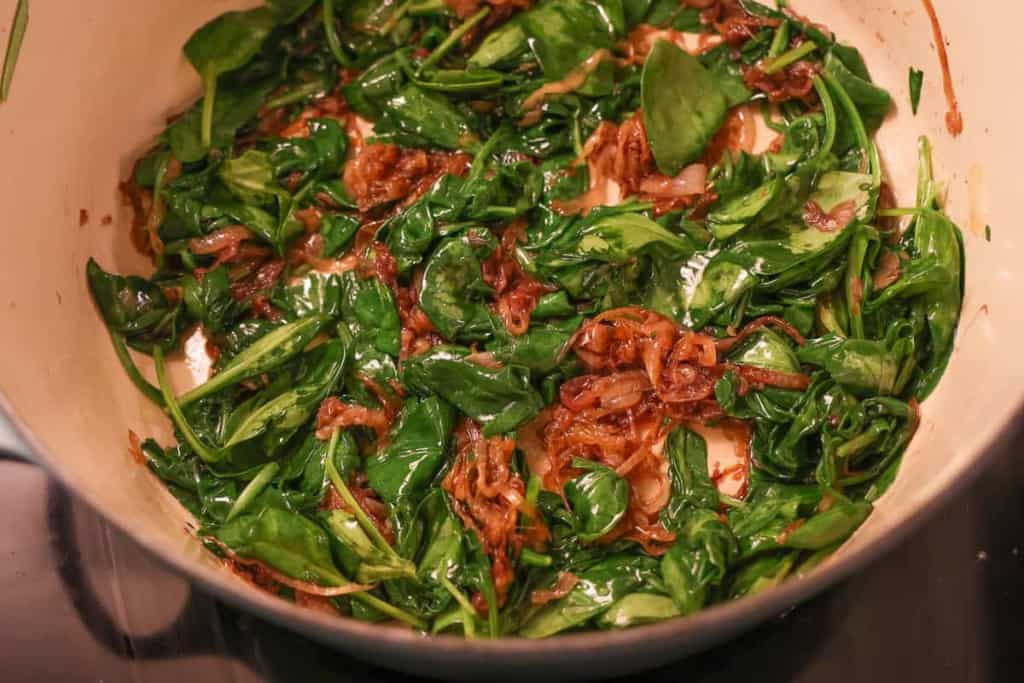
- Once the onions have reduced and caramelized, add in a giant handful of spinach. You’ll see that the spinach will start wilting pretty quickly.
- Give it another good stir and let it wilt for about 2-3 minutes.
- Take it off the heat and set it aside.
Can I use frozen spinach?
Yes, you can use frozen spinach for this recipe! Just defrost it and squeeze out any excess liquid before adding it to the onions.
Can I use other greens instead of spinach?
Absolutely! You can use kale or Swiss chard if you prefer.
Step 5: Blend squash purée
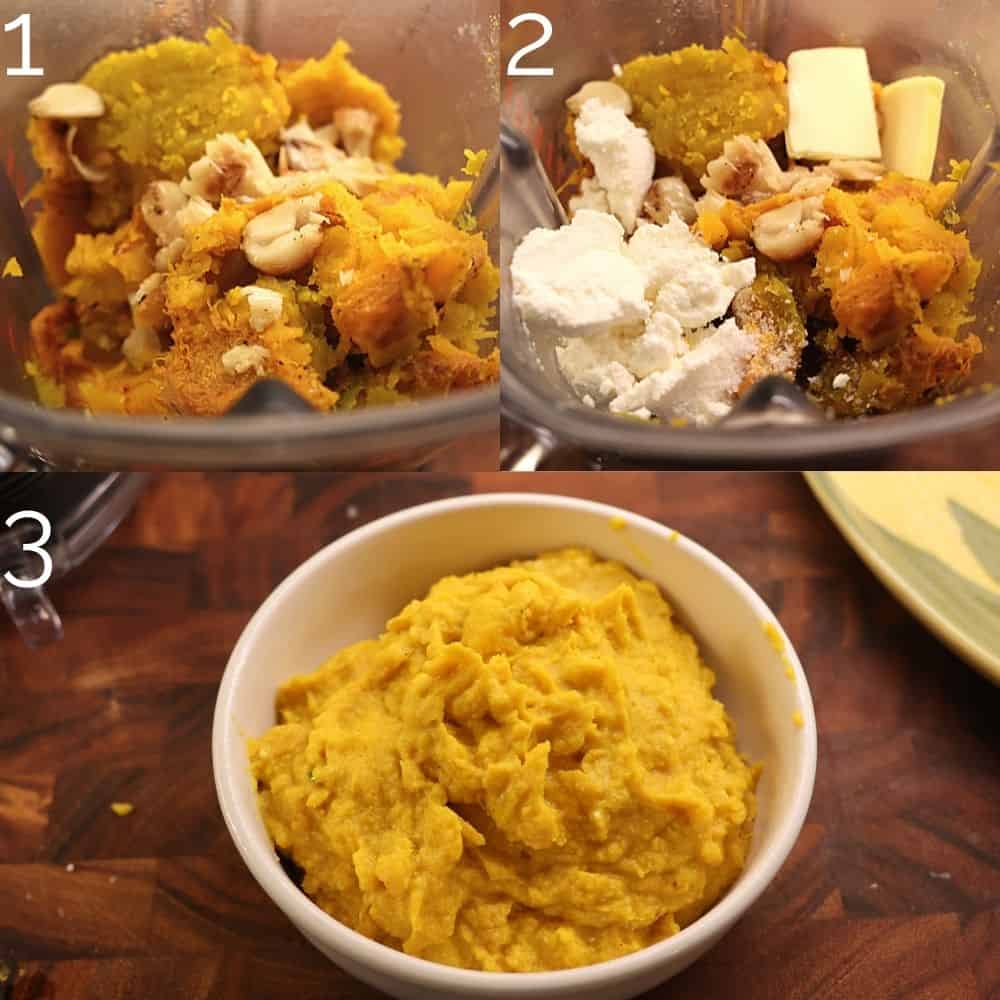
- Once the squash is done roasting, scoop out the flesh and get rid of the skin. Add the squash to a blender.
- Squeeze the roasted garlic cloves into the blender and use a pairing knife to get any cloves that are still in the skin.
- Now, add the egg, ricotta cheese, 1/4 cup of milk, and 2 tablespoons of butter to the squash and garlic.
- Blend everything together until all the ingredients are well combined. The final texture should be similar to mashed potatoes.
- Once everything is combined, set it aside for now.
Tip:
If the puree is too thick, you can add some more milk to thin it out, but remember that you can always add liquid later if needed. Just keep in mind that you can’t take it away once it’s added!
Step 6: Make cheesy béchamel sauce
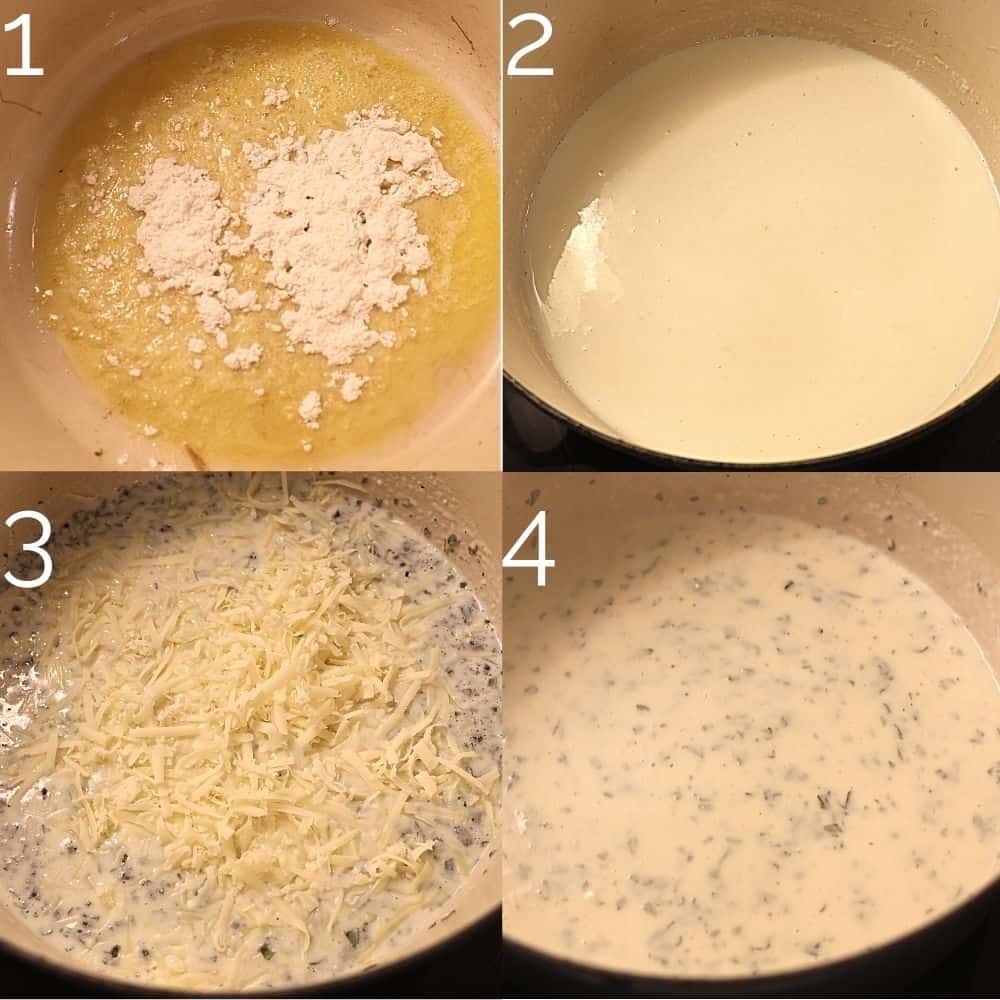
The last step is to make the béchamel sauce. If you’ve never made this sauce before, don’t worry – it’s pretty easy!
- In a Dutch oven over medium heat, go ahead and add 3 tablespoons of butter and let that melt down.
- Once it’s nice and melted, toss in the 3 tablespoons of flour and give it a good whisk to mix everything together. Now, slowly pour in about 2 cups of milk, making sure to whisk out any lumps that might form. Keep whisking until it starts to gently boil.
- Once it’s gently boiling, it’s time to add in the sage, thyme, and nutmeg, along with a little sprinkle of salt and pepper. Give that a good stir.
- Add in the shredded gruyere cheese and whisk it all around until it’s completely melted.
What is a béchamel sauce?
A béchamel sauce is a white sauce that’s made from flour, butter, and milk (a roux). It’s one of the five “mother sauces” in classic French cuisine and is used as a base for many dishes like this lasagna recipe.
What does gruyere cheese taste like?
It is an Alpine Swiss cheese that is rich, creamy, slightly salty, and nutty. I always grate my own cheese from a block since pre-shredded cheese usually has anti-caking agents that don’t allow it to melt as smoothly.
Can I use another cheese besides Gruyere?
Of course! You can substitute Gryuere cheese with any other type of mild, creamy cheese like fontina or mozzarella.
Step 7: Assemble the skillet squash lasagna
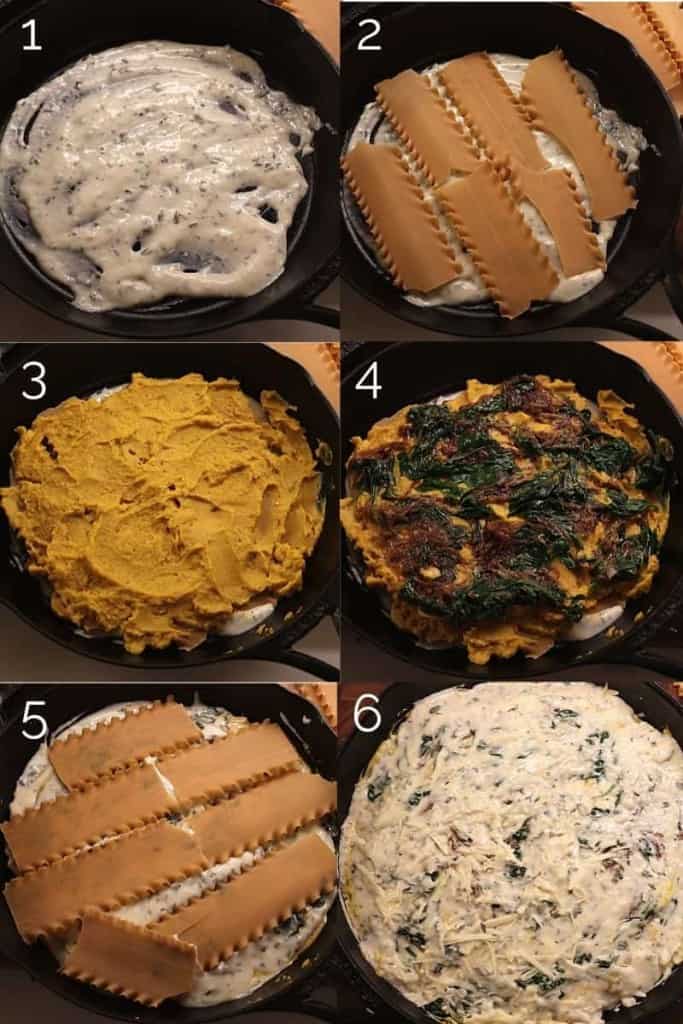
Now comes the fun part – putting everything together!
Here is the lasagna layer order:
- Cheesy béchamel sauce – In a cast iron skillet, start by adding about a third of the yummy cheesy béchamel sauce to cover the bottom.
- No-boil lasagna noodles – For this recipe, you need to use no-boil lasagna noodles, or if you are using regular lasagna noodles, you must boil them prior to adding them (al dente).
- Garlic squash purée: Spoon some dollops of the squash purée and spread it evenly all the way to the edges using a spatula.
- Caramelized onion spinach mix: Add half of the spinach and caramelized onion mix over top of the squash.
- Repeat: Repeat with half the cheesy bechamel, followed by lasagna noodles, squash purée, spinach mix, and finally, the rest of the cheesy bechamel on top.
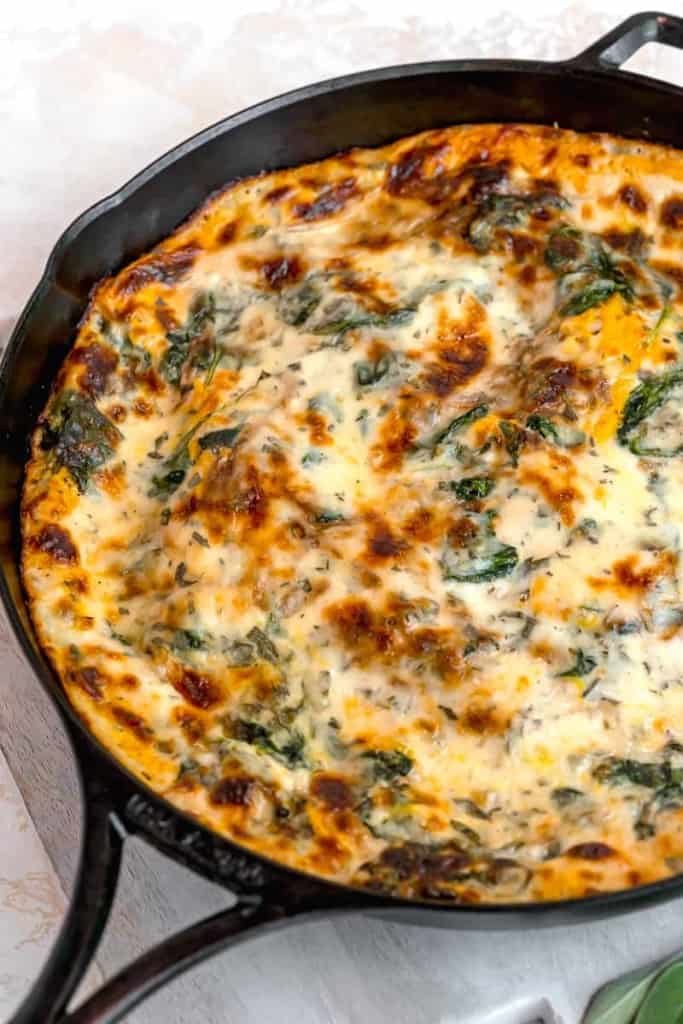
Step 8: Bake the lasagna
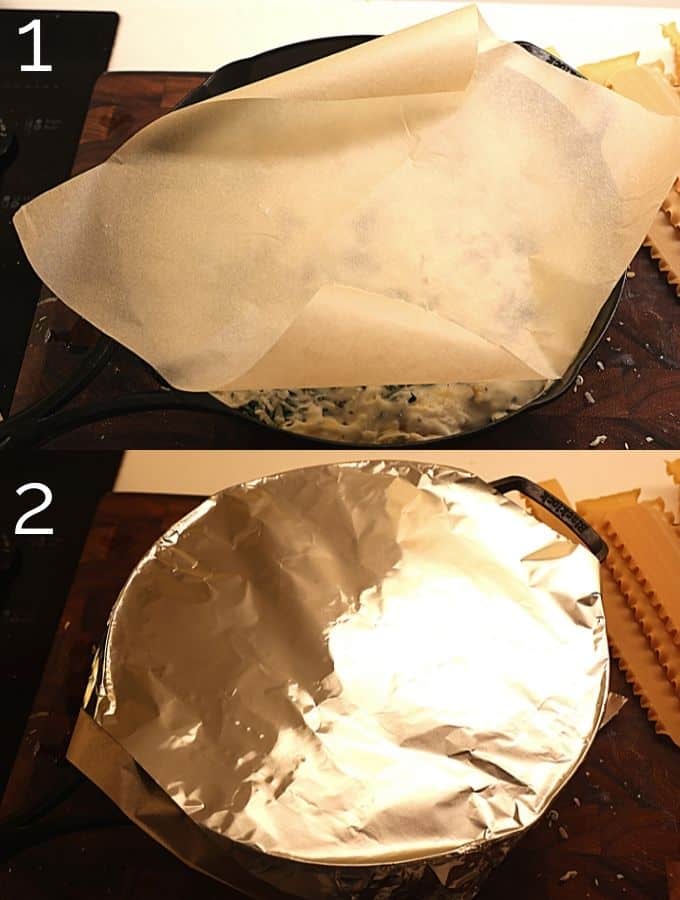
- Once you’ve got the squash lasagna all layered, add a layer of parchment paper and then cover it up with some foil. This way, the cheese won’t stick to the foil while it’s baking.
- Pop it in the preheated oven and let it bake covered for about 20 minutes.
- Then, take off the foil and let it bake for another 15 minutes until the top layer gets all golden and bubbly.
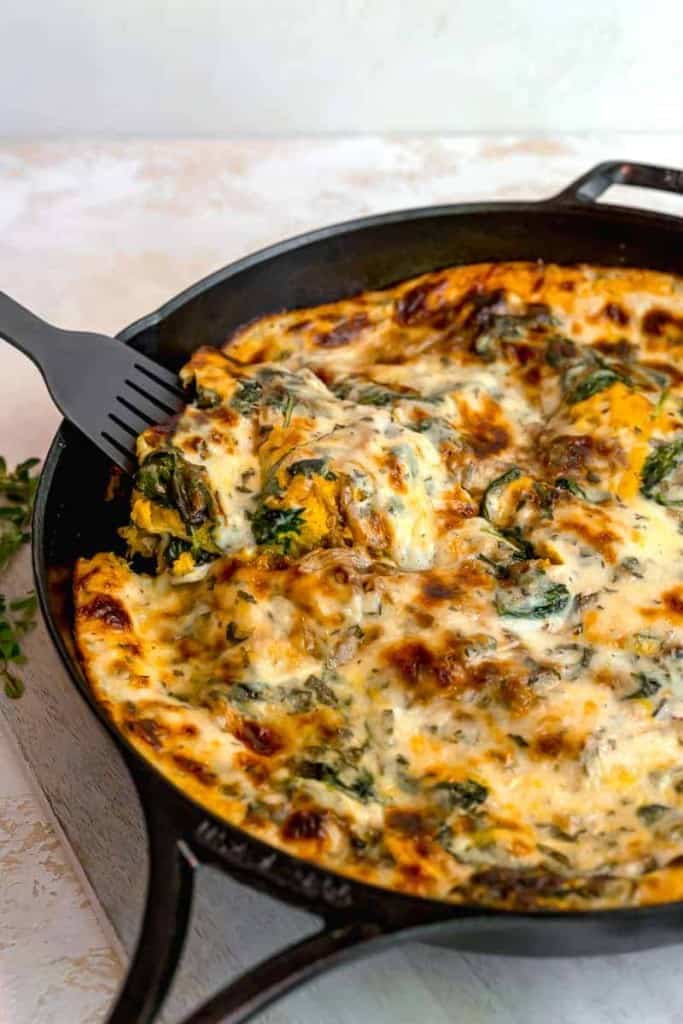
- When it’s done, take it out of the oven and let it cool for about 5 minutes before serving.
Tip:
Since it’s a skillet lasagna, you can dish it up like a pie or cut it into squares. Enjoy!
How to serve kabocha squash lasagna
You can’t have lasagna without homemade garlic bread or garlic butter dinner rolls! It’s like the perfect marriage made in heaven. Serve it with a simple side salad, and you’re set for an amazing dinner!
But wait, there’s more! You can also serve this lasagna as a Thanksgiving side dish or even as a main course for vegetarian guests when you are serving a roasted whole chicken.
It’s one of those recipes that works as a side or as the main meal!
How to make skillet lasagna ahead of time
If you are meal prepping, you can easily make this cast iron squash lasagna ahead of time. Simply follow these steps:
- If you’re planning on making individual layers of the lasagna ahead of time, just keep in mind that you’ll need to reheat the cheesy béchamel sauce before using it.
- If you’re assembling everything and putting it in the fridge, you might need to bake it covered for an extra 5-10 minutes because everything will be colder.

How to store leftovers
To store leftovers, let the lasagna cool down completely (so the cast iron won’t be hot anymore). Then, you can slice it up and put it in an airtight container or transfer the whole thing to a dish for storage.
You can save it in the fridge for up to 3-4 days!
To reheat leftovers, you have a couple of options. You can pop them in the microwave for 2-3 minutes until they’re warm throughout. Or, you can place them in the oven at 350°F, covered, for about 25-30 minutes or until they’re nicely warmed through.

Can I freeze squash lasagna?
Yes! You can totally freeze this squash lasagna. Just make sure to let it cool down completely before wrapping it up tightly in plastic wrap and popping it in the freezer.
Looking for other comforting fall recipes?


For the web story version of this recipe, click here!
Cast Iron 101 E-Book
In this e-book, I will be talking about everything cast iron! From when you buy your cookware, how to maintain it, to cooking in it, and more!
Did you make this? If you snap a photo, please be sure tag me on Instagram at @girlwiththeironcast or hashtag #girlwiththeironcast so I can see your creations!

Squash Skilet Lasagna
Ingredients
- 1 large Kabocha squash (quartered, deseeded)
- 1 head garlic (top 1/3 cut and removed)
- 3 tablespoons olive oil
- Kosher salt
- Ground black pepper
- 1 stick salted butter (divided)
- 2 yellow onions (peeled, cut in half, sliced thin on mandoline)
- 1/4 cup dry white or red wine
- 6 ounces fresh spinach
- 2 cups freshly grated gruyere cheese
- 1 egg
- 4 ounces ricotta cheese
- 2 1/4 cups whole milk (divided)
- 3 tablespoons all purpose flour
- 2 tablespoons freshly chopped sage
- 2 tablespoons freshly chopped thyme
- 1/4 teaspoon ground nutmeg
- 1 package no-boil lasagna noodles
Email this Recipe!
Email this recipe to yourself to save for later.
By submitting this form, you agree to receive emails from Girl with the Iron Cast.
Equipment
Before You Begin! If you make this, please leave a review and rating letting us know how you liked this recipe! This helps our business thrive & continue providing free recipes.
Instructions
Kabocha squash & garlic
- Preheat oven to 400F
- Using a sharp chef’s knife, carefully cut squash in half. Using a spoon, scoop seeds out of squash and discard. Cut squash halves in half, so that you have 4 pieces of squash.
- Place squash on a baking sheet and brush the insides with olive oil, then liberally salt and pepper each quarter.
- Cut top 1/3 off garlic head. Place on foil and drizzle 1 tbsp of olive oil over exposed cloves. Add a pinch of salt and pepper over the top, then tightly wrap in foil. Place on the baking sheet with the squash.
- Roast for 45 minutes, until the squash and garlic are easily pierced with a fork.
Caramelized onions
- While the squash and garlic roasts, caramelize onions. In a dutch oven over medium-low heat, add in 3 tbsp butter and melt. Once melted, add in the sliced onions.
- Cook the onions down, mixing every so often, until they are caramelized, about 45 minutes. They should be dark amber and jammy once finished.
- Once onions are caramelized, add in 1/4 cup of wine and allow the liquid to reduce for 3 minutes. Add in the spinach and allow to just wilt, about 2-3 minutes. Remove from heat and set aside.
Squash purée
- For this next part you can use a blender or hand mash, since the consistency is thick I recommend hand mash. Once the squash is done roasting, scoop the flesh out and discard the skin of the squash. Add squash to bowl or blender. Squeeze garlic cloves and using a pairing knife to get any cloves in the skin.
- Add egg, ricotta cheese, 1/4 cup milk and 2 tbsp butter to the squash and garlic. Mix until ingredients are incorporated. You’re looking for the consistency of mashed potatoes. You can add additional milk to thin out, but remember you can always add liquid, but you can’t take away. Set aside once combined.
Cheesy béchamel sauce
- In the dutch oven over medium heat, add 3 tbsp butter and allow to melt. Once melted, add in the 3 tbso flour and whisk to combine. Slowly begin pouring in 2 cups of milk, while whisking the lumps out. Bring to a gentle boil.
- Once gently boiling, add in the sage, thyme, nutmeg, and a 1/4 tsp salt and 1/4 tsp pepper. Stir to combine. Add in the shredded gruyere cheese and whisk until fully melted. Turn heat off.
Assembling squash lasagna
- In a cast iron skillet, add 1/3 of the cheesy béchamel sauce to coat the bottom of the skillet. Next add a layer of no-boil lasagna noodles, breaking them up to fit the skillet. Spoon a few dollops of the squash purée and spread an even layer to the edges with a spatula. Add some of the caramelized onion and spinach mix over top, then repeat.
- Order of layers: cheesy béchamel sauce, lasagna noodles, squash purée, caramelized onion spinach mix, ending with the last of the cheesy béchamel sauce over the top.
Bake
- Once the squash lasagna is assembled, add a layer of parchment paper, followed by foil over the top. The parchment paper will keep the cheese from sticking to the foil while baking.
- Bake at 400F covered for 20 minutes, then uncovered for 15 minutes until the top layer is golden and bubbly.
- Remove from oven and allow to cool for 5 minutes before serving. Since it is a skillet lasagna, you can serve like a pie or cut into squares. Enjoy!
Notes
*See in-post for step-by-step photos of all elements to recipe*
Making ahead of time:
This squash lasagna can be made ahead of time prior to assembly or after fully assembled.- If making individual elements ahead of time, cheesy béchamel sauce will have to be reheated prior to using.
- If assembling fully and refrigerating, you may need to bake covered an additional 5-10 minutes since all the elements will be colder.