This post may contain affiliate links. Please read our disclosure policy.

These fall-off-the-bone dry rub ribs are tender, flavorful, and incredibly easy to make right in the oven. Coated in a bold homemade spice rub and baked low and slow, these ribs come out juicy on the inside with a perfectly seasoned crust on the outside… no grill required.
Whether you’re making them for a weekend dinner, game day, or a casual get-together, this oven baked ribs recipe delivers restaurant-quality results with minimal effort.

Why You’ll Love These Dry Rub Ribs
- Fall-off-the-bone tender every time
- No grill needed—made entirely in the oven
- Packed with bold, smoky flavor
- Simple ingredients and easy prep
- Perfect for entertaining or family dinners
Email this Recipe!
Email this recipe to yourself to save for later.
By submitting this form, you agree to receive emails from Girl with the Iron Cast.
What Are Dry Rub Ribs?
Dry rub ribs are coated in a blend of spices instead of being slathered in sauce before cooking. This method allows the natural flavor of the meat to shine while creating a flavorful crust as the ribs cook.
Unlike saucy ribs, dry rub ribs are all about balance—savory, smoky, slightly sweet, and perfectly seasoned in every bite.
Why should I make a dry rub for my ribs?
- Flavor infusion: Dry rubs are a mixture of spices, sugars, and salts that permeate the surface of the meat. They create a flavorful crust that sears into the meat during cooking, infusing it with layers of taste.
- Customization: Dry rubs offer endless possibilities for customization. You can tailor the rub to your liking, adjusting the spice level, sweetness, and overall flavor profile to suit your taste preferences.
- Texture enhancement: Dry rubs not only add flavor but also contribute to the texture of the ribs. The sugars in the rub caramelize during cooking, creating a delicious crust that adds crunch and complexity to each bite.
- Moisture retention: Contrary to what you might think, dry rubs can actually help retain moisture in the meat. The salt in the rub helps to draw out moisture initially, but then it forms a barrier that locks moisture in during the cooking process, resulting in juicy, tender ribs.
- Convenience: Dry rubs are easy to apply and require minimal preparation compared to marinades or sauces. Simply coat the ribs generously with the rub, let them sit for a while to absorb the flavors, and then cook them according to your preferred method.
How to prep ribs for grilling
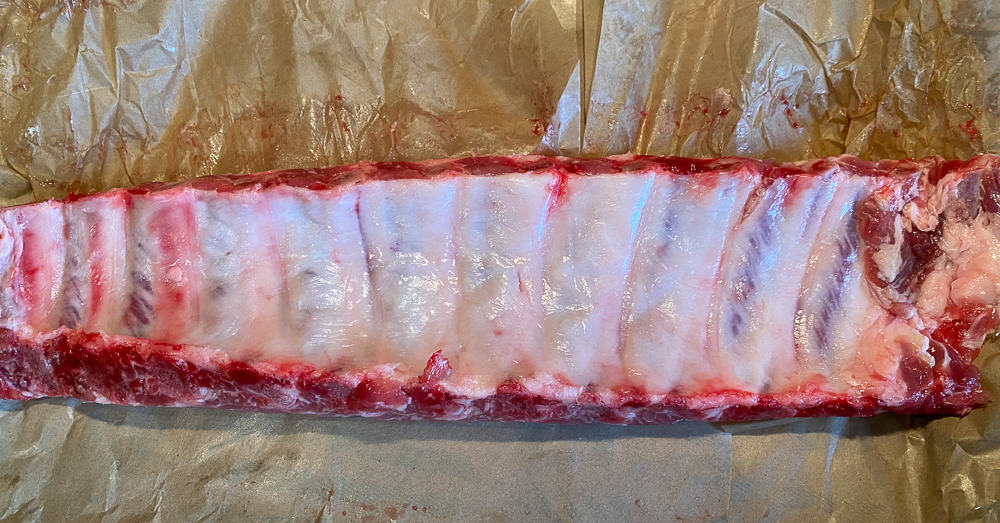
Before seasoning the baby back ribs with the dry rub, there is some prep work to be done.
The thick membrane on the back of the ribs needs to be removed before seasoning and cooking the ribs. If you don’t remove the membrane, the ribs will be tough and chewy once they are cooked.
The easiest way to remove the membrane from the back of your ribs, is to ask the butcher to do it for you when buying the meat. However, if you want to remove the membrane at home yourself, it is quite easy and you can follow the steps below!
How to remove the rib membrane
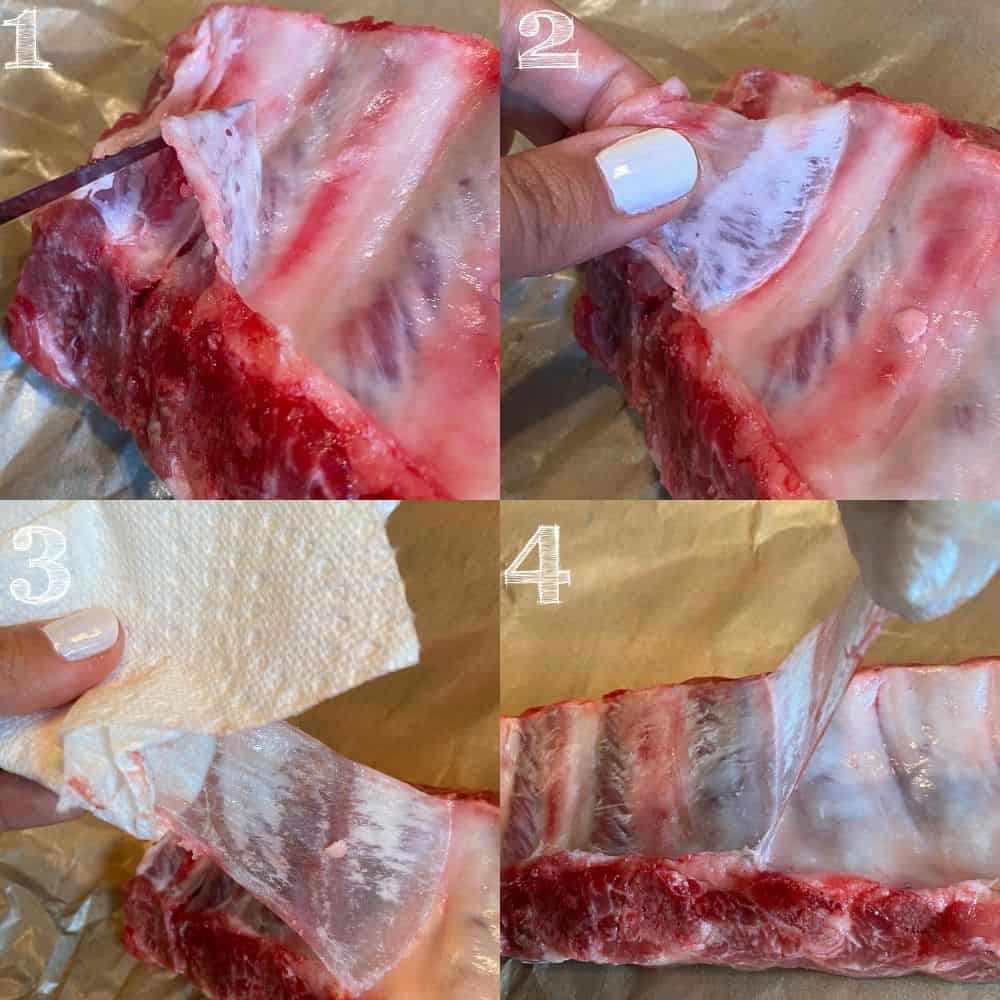
It takes a bit of work (and some tugging) but here’s how I remove the membrane from a rack of ribs!
- Place the ribs so that the curved back is facing up.
- Using a sharp knife, on one end of the rib rack, slice under the membrane but above the bone.
- Using your fingers, pinch and pull so the membrane begins to lift.
- Because the membrane can be slippery, I use a paper towel to grip the membrane.
- Peel back the entire membrane across the rack of ribs and discard.
The membrane doesn’t always come off at once, and some areas may be more stubborn to get off. Just keep pulling until it all comes off!
What is a dry rub?
How Long to Cook Ribs in the Oven
For best results, cook ribs low and slow:
- 275°F: 2.5 to 3 hours
- 300°F: About 2 to 2.5 hours
Ribs are done when they are tender and the meat pulls away easily from the bone.
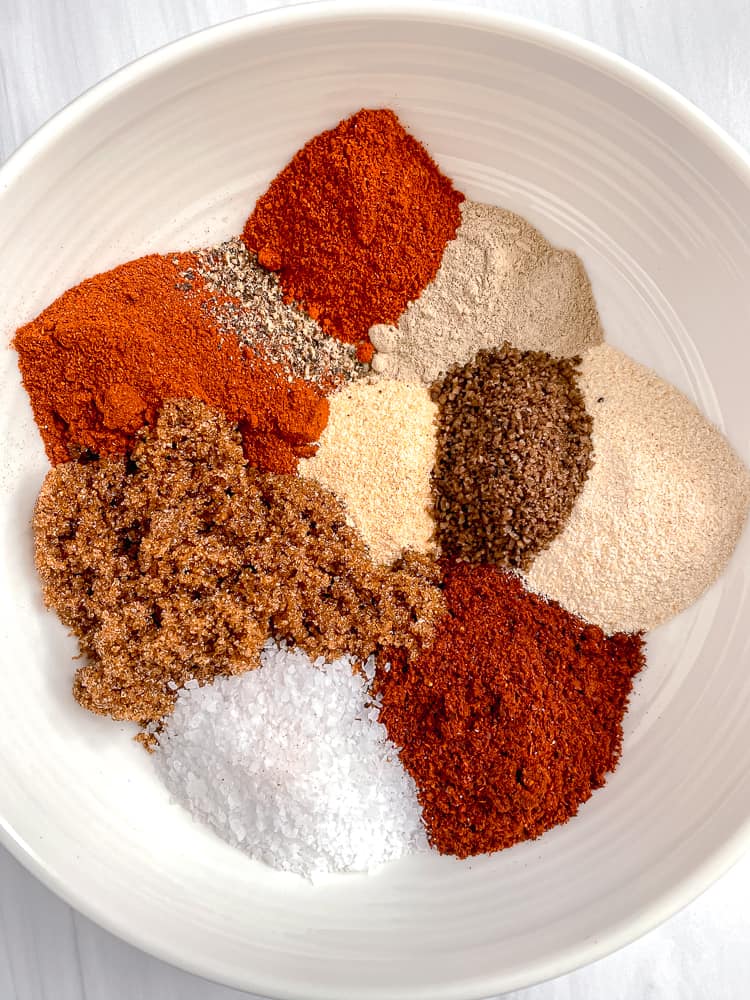
What spices to use for the best rib rub
My dry rub gives the baby back ribs the most incredible flavor. It’s both smoky and sweet and has a hint of heat. Not only is it more cost effective to make your own dry rub with spices, it is also easy to customize your seasoning blend to cater to your personal taste.
Here are the spices and ingredients I use for my dry rubbed ribs:
- Brown sugar
- Paprika
- Chili powder
- Granulated garlic
- Granulated onion
- Black pepper
- White pepper
- Cayenne
- Smoked salt
- Kosher salt
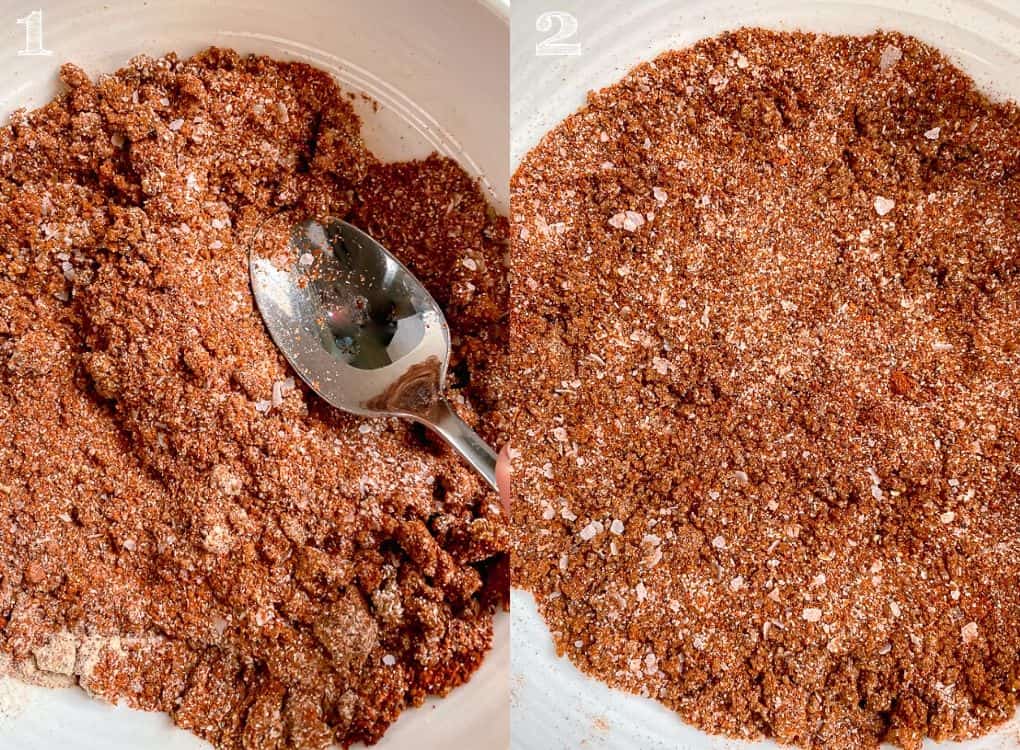
How to make the best dry rub for ribs
Using a spoon, mix the seasonings together.
These dry rub ingredients are enough for two racks of ribs. This dry rub can be easily multiplied to accommodate extra racks of ribs. Whatever is leftover, I just put it in a jar so it’s ready to go the next time I make dry rub ribs. It should be a staple in your pantry!
Spice Tip
The brown sugar can clump, so I use the back of a spoon to smooth it out.
How to add your dry rub to the ribs
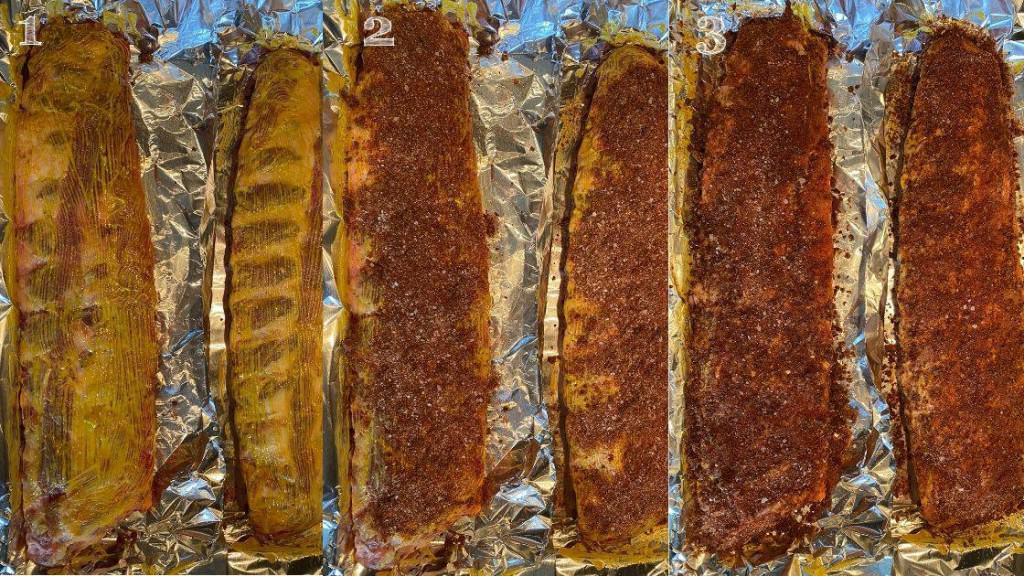
- Slather some yellow mustard on first and brush it all over the ribs. Using the yellow mustard not only helps the rub stick to the ribs, but the vinegar helps tenderize the rib meat. Trust me, you won’t taste the mustard once they are cooked!
- Sprinkle some of the spice rub over the ribs, and using your fingers, massage it into the rack.
- Flip over and repeat.
- After you have rubbed both sides of the ribs, wrap them in foil. The curved side of the ribs that you tore the membrane off, should be facing down.
- Place the two racks in the fridge for 2 hours to marinate. This will allow the rub to permeate into the ribs and flavor them deep into the meat.
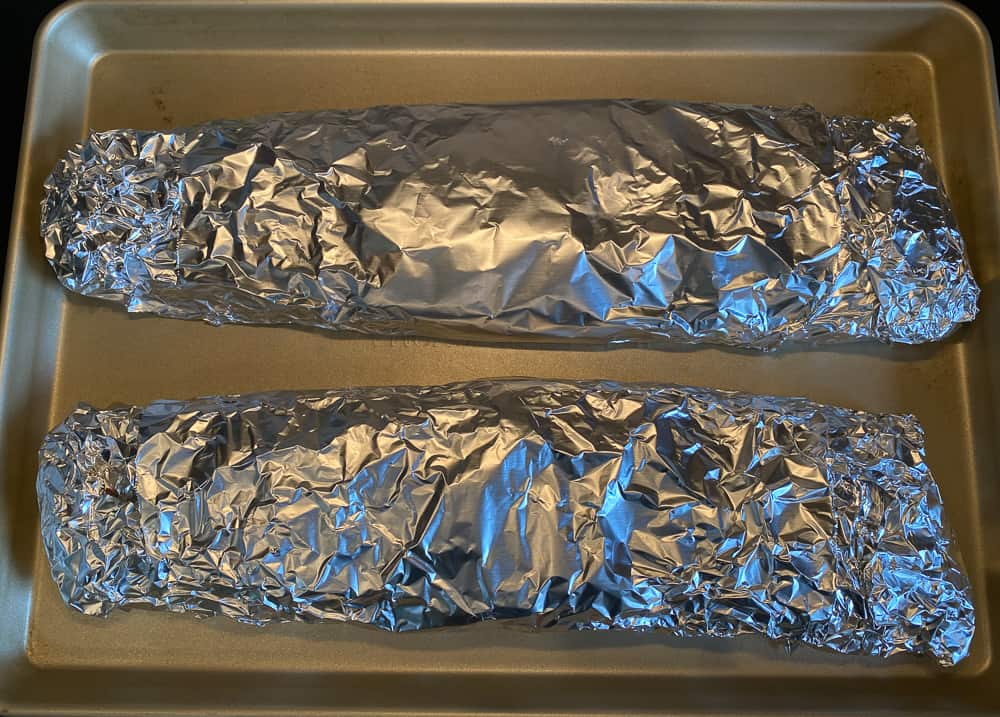
Should You Wrap Ribs in Foil?
Yes—wrapping ribs in foil helps trap moisture and creates that fall-off-the-bone texture. This method essentially steams the ribs while they cook, keeping them juicy and tender.
Be gentle to not tear the foil. If the liquid leaks out of the foil, it will leave you with dried out ribs. Adding an extra piece in the middle ensures they are sealed.
How-to bake baby back ribs in the oven
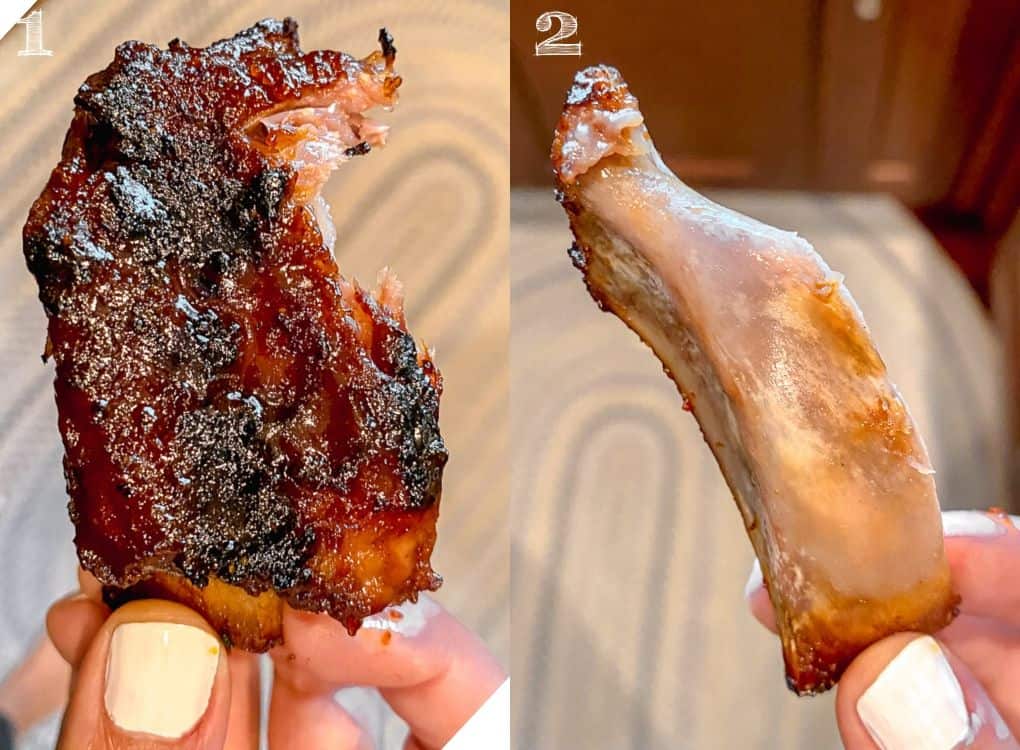
What makes these baby back ribs fall off the bone, is the low and slow cook time in the oven.
I cook the dry rubbed ribs at 275°F for 2 1/2 hours. The moisture is locked in, giving you tender, juicy ribs. After 2 1/2 hours, remove your ribs from the oven and use a meat thermometer to check the temperature. Ribs are technically done and safe to eat at 145°F, but if you want them falling off the bone, the temperature should be 190-200°F.
Finish the dry rub ribs on the grill
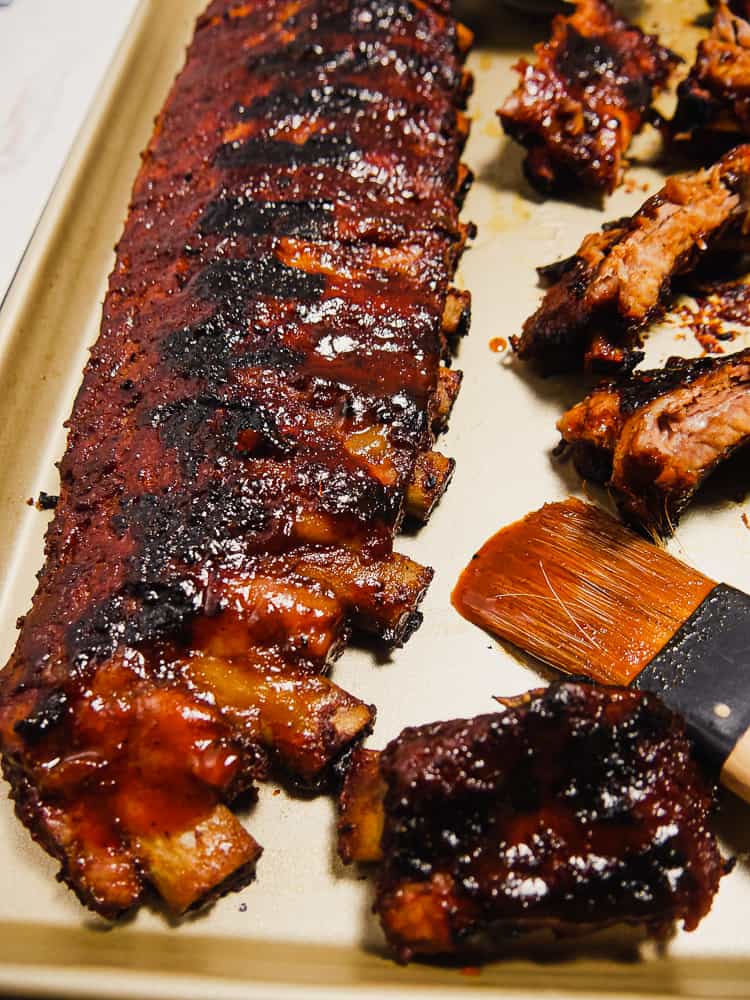
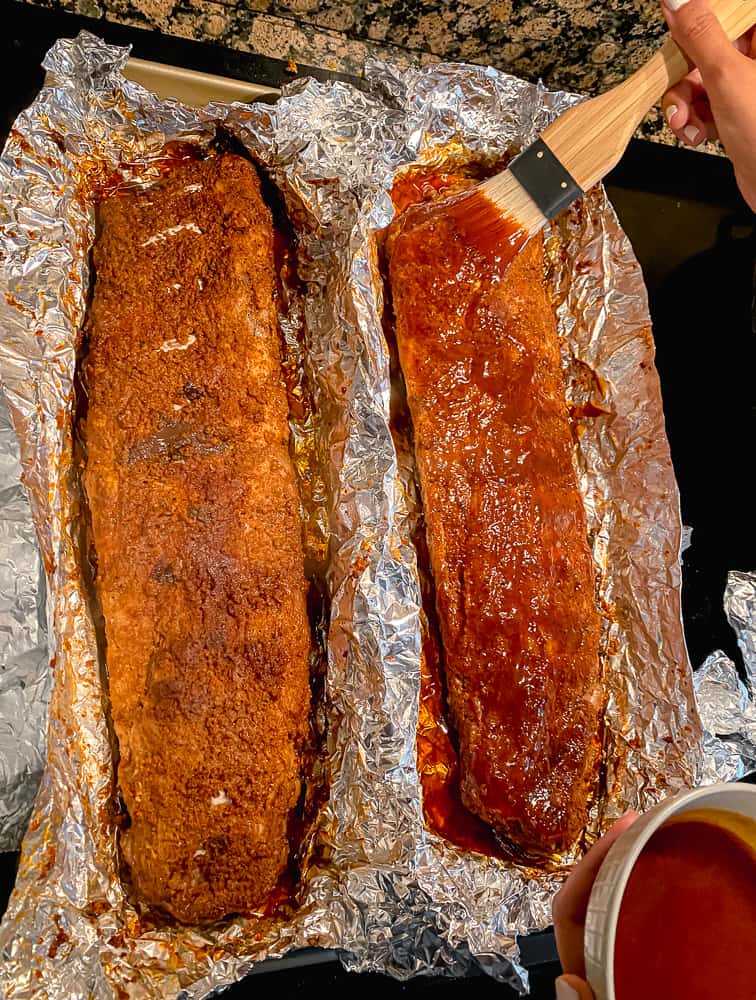
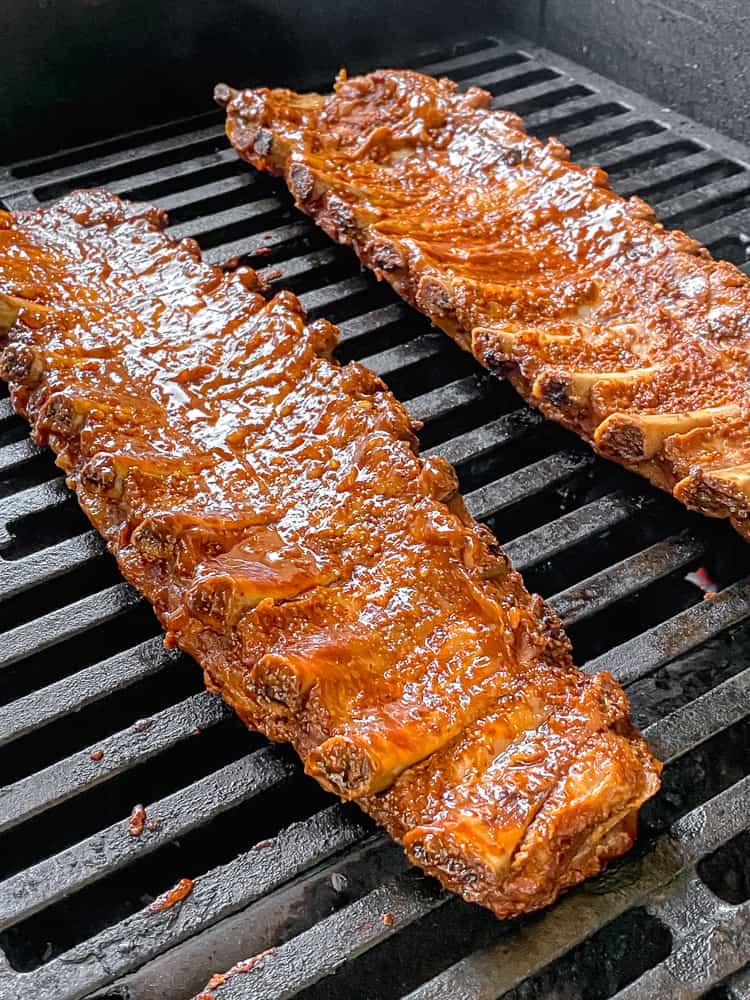
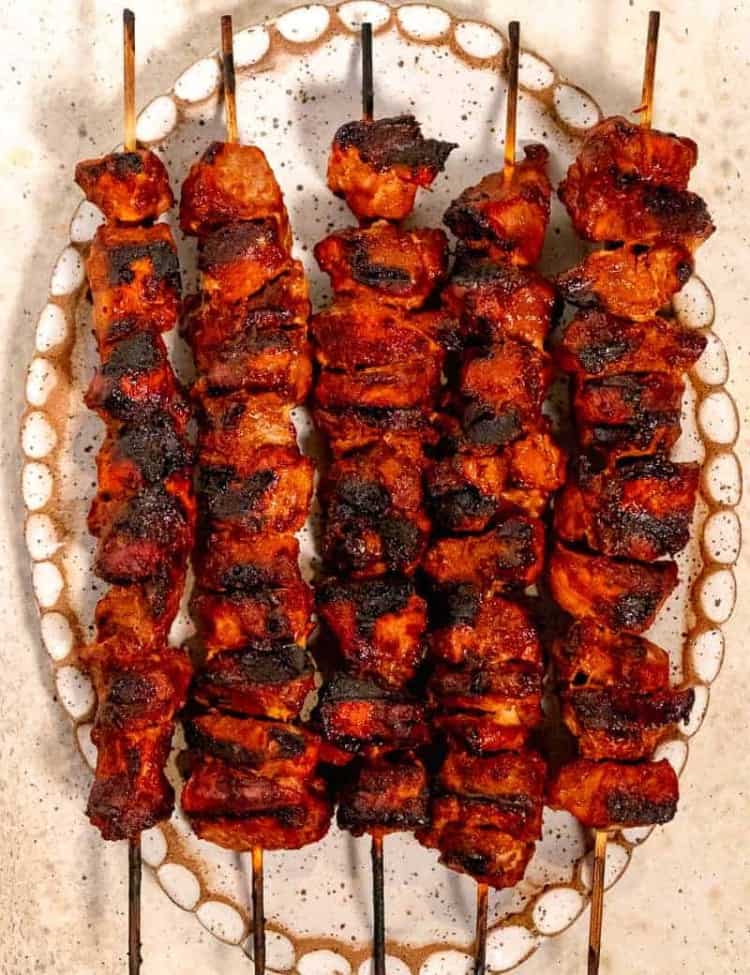
To get that delicious char on the ribs, I finish them on the grill. Once you remove them from the oven, brush your favorite BBQ sauce on top!
On a medium-heated grill (350°F), place the ribs top side down (the side you slathered the BBQ with). While that side chars, brush more BBQ sauce on the ribs.
Char the dry rub ribs for about 10 minutes total, flipping halfway through and adding BBQ sauce as needed.
How to flip ribs on the grill
Since the ribs will be SO tender coming out of the oven, they may split when grilling. I use two sets of tongs, one on each side, to flip them and help them from falling apart.
Don’t have a grill to finish your ribs on? Broil them!
After the ribs are finished baking in the oven, remove the foil and broil them on high for a minute or two (keep an eye on them so they do not burn).
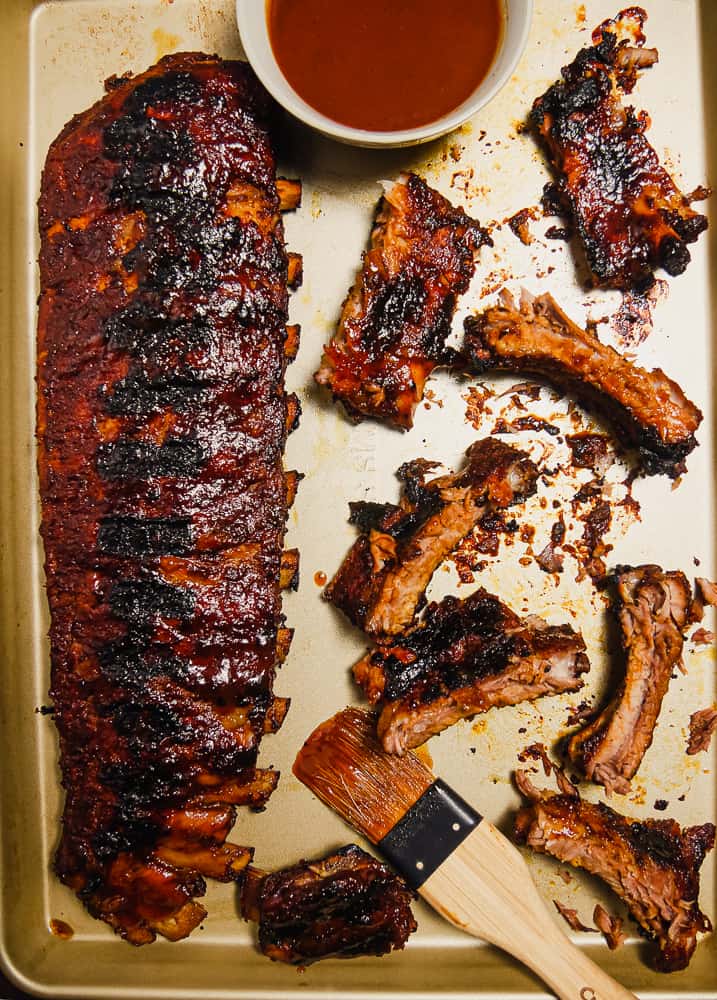
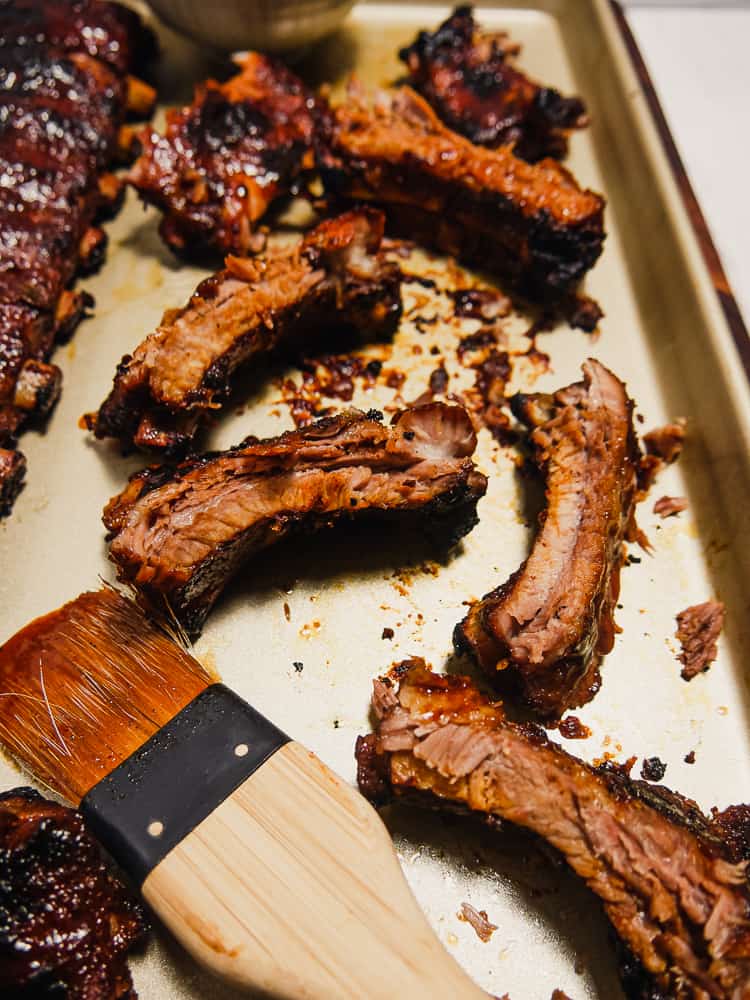
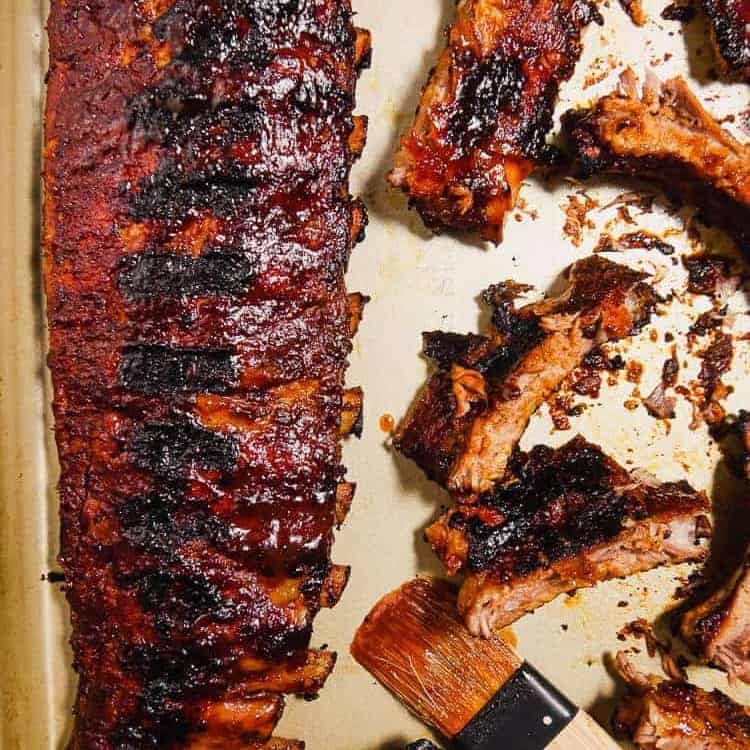
How to cut the ribs
The best way to cut baby back ribs is curved side up. This allows you to see the bones and make even slices. Make sure to use a good sharp knife to get clean cuts.
Serve with extra BBQ sauce on the side and enjoy!
Tips for Fall-Off-the-Bone Ribs
- Use a meat thermometer if needed (target ~190–203°F for tenderness)
- Remove the membrane for better texture
- Don’t rush the cooking process—low and slow is key
- Wrap tightly in foil to retain moisture
- Let the ribs rest before slicing
Storage & Reheating
- Refrigerator: Store leftovers in an airtight container for up to 4 days
- Reheating: Wrap in foil and warm in a 300°F oven until heated through
- Freezer: Freeze cooked ribs for up to 2–3 months
Frequently Asked Questions
How do you make ribs fall off the bone?
Cook them low and slow and keep them wrapped in foil to retain moisture. This breaks down the connective tissue and makes the ribs tender.
Can I make dry rub ribs without foil?
Yes, but they may be less tender. Foil helps create the soft, fall-off-the-bone texture.
What’s the best type of ribs to use?
Baby back ribs are leaner and cook faster, while St. Louis ribs are meatier and more flavorful.
Can I make these ahead of time?
Yes. Cook the ribs fully, then reheat in the oven before serving.
Do I need BBQ sauce?
No—these ribs are packed with flavor from the dry rub alone, but you can add sauce if you prefer.
What to Serve with Dry Rub Ribs
These ribs pair perfectly with:
- Coleslaw
- Cornbread
- Baked beans
- Potato salad
- Grilled vegetables
Final Thoughts
These fall-off-the-bone dry rub ribs are proof that you don’t need a grill to make incredible ribs at home. With a simple spice blend and a low-and-slow cooking method, you’ll get tender, juicy ribs every time.
Whether you serve them as-is or finish with your favorite BBQ sauce, this easy oven baked ribs recipe is guaranteed to impress.
Looking for more pork recipes?
For the web story version of this recipe, click here!
Made this recipe and loved it? Leave a star rating below!
Did you make this? If you snap a photo, please be sure tag me on Instagram at @girlwiththeironcast or hashtag #girlwiththeironcast so I can see your creations!
Fall-Off-The-Bone Dry Rub Ribs
Ingredients
- 2 racks baby back ribs (membrane removed (see note #1))
- 4 tablespoons yellow mustard
- 2 tablespoons dark brown sugar
- 1 tablespoon smoked paprika
- 1 tablespoon chili powder
- 1 tablespoon granulated garlic
- 1 tablespoon granulated onion
- 1 teaspoon ground black pepper
- 1 teaspoon white pepper
- 1 teaspoon cayenne pepper
- 1 teaspoon smoked sea salt
- 1 tablespoon kosher salt
- BBQ sauce of choice
Email this Recipe!
Email this recipe to yourself to save for later.
By submitting this form, you agree to receive emails from Girl with the Iron Cast.
Before You Begin! If you make this, please leave a review and rating letting us know how you liked this recipe! This helps our business thrive & continue providing free recipes.
Instructions
- See note #1 on removing membrane from baby back ribs. This step is important! If you do not remove the membrane you will end up with tough chewy ribs.
- In a bowl, add all of the spices. Mix with a spoon until combined. Use the back of the spoon to press out any large clumps.
- Tear two sheets of aluminum foil, long enough to pass the sides of each rack of ribs. Place one rack, curved side down (the side that you removed the membrane will be facing down), per foil. Using a brush, spread 1 tbsp of yellow mustard on each rack. Sprinkle a 1/4 of the dry rub on the rack and using your fingers, spread. Flip the racks over and repeat mustard and dry rubbing.
- Once the ribs have been rubbed, carefully wrap the aluminum foil closed. I add an extra sheet of foil around the center, to ensure the ribs are fully sealed. [See note #3]. Place them curved side down, so that the side you removed the membrane, is facing down.
- Place in the refrigerator and allow to marinate for 2 hours.
- Preheat oven to 275℉. Remove ribs from refrigerator, place on baking sheet curved side down(the side you removed the membrane, is facing down) and bake for 2 1/2 hours. If you see liquid start coming out onto the baking pan, carefully wrap with more foil.
- Preheat grill to 350℉. After the ribs have baked low and slow in the oven for 2 1/2 hours, remove from the oven. Carefully open the foil. Using a meat thermometer, take the temperature in between the bones. Pork is technically done at 145℉, but if you want fall-off-the-bone ribs the temperature shoud be at 190°F-200°F.
- Using your favorite BBQ sauce, brush the top of the ribs with the sauce. Since the ribs will be so tender, they may fall apart transferring to the grill. Use two sets of tongs (one on each side) to help them stay together when flipping. Place the ribs sauced side down, onto the grill. While that side chars, brush BBQ sauce on the side facing up. Grill for about 5 minutes per side, until ribs get charred grill marks. Remove from grill.
- To slice, place the ribs curved side up, so you can see the bones. Slice in between bones and serve with additional BBQ sauce.
Notes
Removing the membrane
- Butcher: Ask a butcher to remove the membrane when buying the ribs.
- Doing it yourself: Place the ribs so the curve back is facing up. Using a sharp knife, on one end of the rack, slice under the membrane but above the bone. Using your fingers, pinch and pull so the membrane begins to lift. Because the membrane can be slippery, use a paper towel to grip the membrane and peel back to remove, discard. The membrane doesn’t always come off at once and some areas may be more stubborn to get off.
Sides of the baby back ribs
- In this recipe I refer a lot to the “curved side”, this is the bone side which is also the side where you are removing the membrane from.
Dry rub
- This dry rub recipe makes enough for 2 racks of ribs. Double ingredients for 4 racks of ribs. If you have leftover rub, you can store in a sealed jar for later use.
- Minimum time to marinate the ribs in the rub is 2 hours. You can also marinate them overnight in the fridge.
Foiling the ribs
- Make sure there are no holes or tears in the foil. Any punctures or rips will let liquid out and you’ll end up with dried out ribs.
BBQ Sauce
- Feel free to use your favorite BBQ sauce for this recipe
- My personal favorite BBQ sauce to use: Lillie’s Q Smokey BBQ sauce
Don’t have a grill?
- After the ribs have baked in the oven and you have applied the BBQ sauce, you can remove the foil and broil them in the oven for a few minutes to get a crisp top. Keep an eye on them so they do not burn.
I made these last Christmas, and my kids requested them again this year. I had enough of the dry rub left over last time to use on other grilled meats, but this time I got smart and made more ribs! Thanks for the excellent recipe!
Hi, I’m
Curious if I should bake spare ribs longer! PS im
Obsessed with your recipe and it’s a household staple here
Hi Anastaisa, I’m so glad you love this recipe! Yes spare ribs typically take longer to cook than baby back, I would check them after an additional 30 minutes but they might need an extra hour. Aim for 3-3 1/2 hours for the spare ribs. Enjoy!
Literally, best ribs ever! Only marinated about 40 min. Only used the oven, baking according to directions, broiled low for 7 min, high for 7 min, slathered some with BBQ sauce & left some without, then broiled high another 5 min. Perfect consistency, juicy & flavorful! Thanks for sharing!
hello! i am looking to make these for a large crowd, probably about 20 full racks of ribs. not sure if you’ve tried this many at once, but what would you suggest for the oven? do you think the rib racks could be stacked on top of each other to cook in the oven? or maybe i could just line them up in the oven directly on the 2 oven racks, placed both as close to the middle as possible? any suggestion would be great!
i know it’s kind of a random question, but thought i’d ask. thanks!!
Hi Jam! I responded to your previous question about this 🙂 please visit your previous comment for my reply
Hello! I would like to make these for a large group. What would you suggest for the oven? lay them all out on the oven racks and not on a pan? Or can the foil wrapped ribs be stacked to cook in the oven? I would be making probably 20 full racks of ribs. Thank you!!
Hi Jam,
The pans are for catching juices that leak out of the wrapped foils, so I wouldn’t recommend not using them.
You can stack them, BUT I have never tried it this way and with such a large volume of racks it will most definitely affect cooking time. It will take longer, but again since I haven’t cooked this volume myself I am not sure the amount of time to recommend. What I do recommend is switching them around halfway through since they can unevenly cook when stacked like that.
What I would personally do in this situation is bake half of them then the other half, this should reduce the need to stack them. Then proceed with the end of the recipe on the grill and this will help reheat the first batch.
A thermometer will be your friend in this situation and give yourself extra time. Hope this helps! Enjoy.
Amazing ribs.Guests for dinner said they were the best ribs they ever had.
I have been using this recipe as my go to for ribs a couple of years now. These are the juiciest, most flavorful ribs! The yellow mustard really makes a difference too. I don’t have a grill and sometimes I sauce and sometimes I don’t.
I’m so glad you enjoyed the recipe Gena, thanks for making it!
These are by far the best ribs I have ever had! I did not change anything. Thank you!!
Wow what a compliment Pamela! Thank you so much for your kind words. Cheers!
Tried this recipe once and it turned out great so I made more today but this time I cold smoked the rack on my smoker before I threw them on the gas grill. Great smoke flavor and they fell off the bones when I pulled them out of the foil. Great recipe.
Smoking it is next level flavor! I for sure need to try that next time Shawn. Thanks for making it, cheers!
I love it definitely 💯